A: Baffles and mesh filters become barriers to airflow, and/or allow grease to pass through. The video below explains the centrifugal filtration difference!
Determine if the source of the noise is the damper, motor, or wheel. No matter the issue, it is almost always an easy fix, we just have to figure out which part needs adjusting. Follow the steps below to pinpoint.
- Damper Troubleshoot: Check out this short video illustrating very COMMON (and easy to fix!) damper issues that cause scraping/tapping noises.
Still making noise? Go to Motor Troubleshoot.
2. Motor Troubleshoot: To determine whether the problem is with the motor or wheel, remove the wheel, which is done with regular cleaning and maintenance (see video below). With the wheel (and housing) off, turn the hood on. Operation of the motor at this point should be almost silent, with just a slight hum. Check out this short video illustrating the step-by-step maintenance disassembly process.
- Still making noise? Ensure that the motor mount screws AND motor plate screws are securely fastened.
- If the motor has a bad bearing causing the noise, then call us (or local Vent-A-Hood dealer) for a new motor. Simply remove the 3 hex motor mount screws, disconnect bad motor, and connect new motor. Replace screws.
- If the noise is not coming from the motor, then follow step 3, Wheel Troubleshoot.
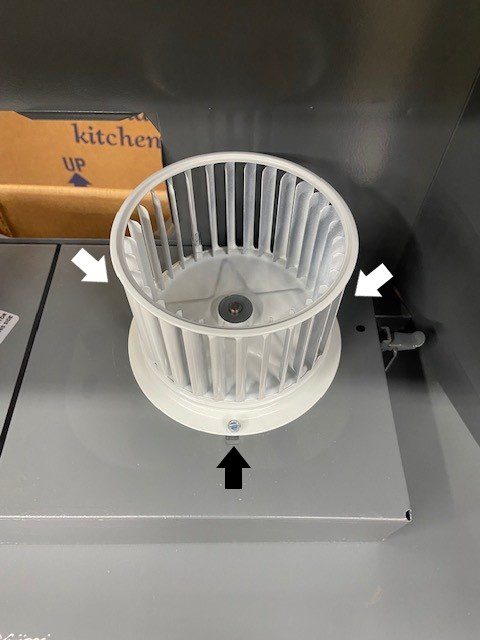
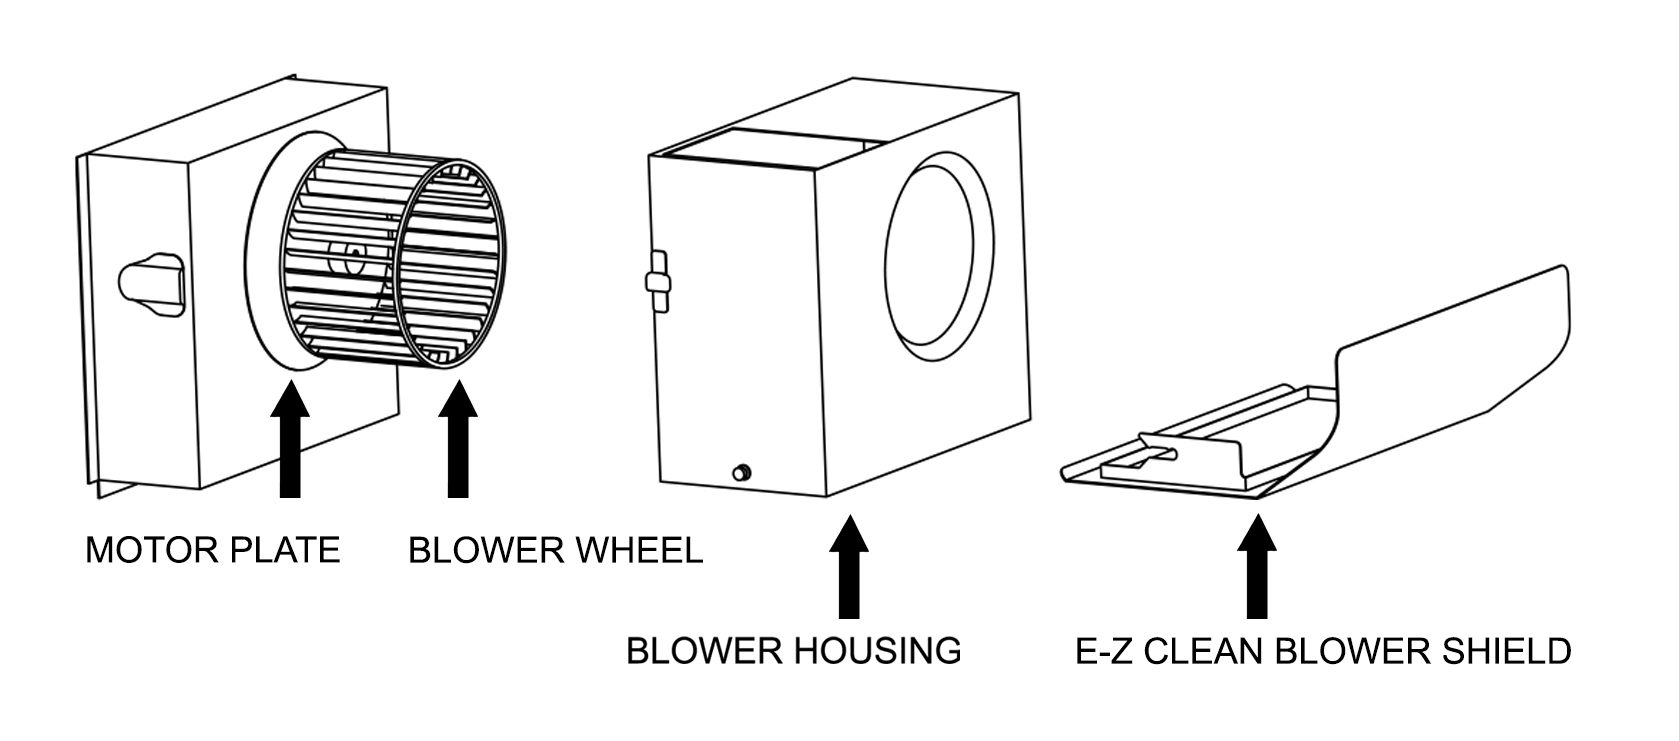
3. Wheel Troubleshoot: The blower wheel may need to be repositioned on the motor shaft. Newer motors have a “backstop” (see image below, or the care and maintenance vid above) preventing the wheel from being installed too far back on the shaft, but if you have an older-style motor the wheel may be positioned too far back and could be rubbing on the motor plate screws (see image). If too far forward, it may rub the inside of the blower housing.
If the wheel is out-of-round or unbalanced, it will need to be replaced. Call us or your local Vent-A-Hood dealer for a new wheel.

Give us, Shady Oak, a call 888-933-6529 (Weekdays, 9-5) to:
- Troubleshoot further
- Order parts, and/or
- Get help finding a VAH servicer in your area
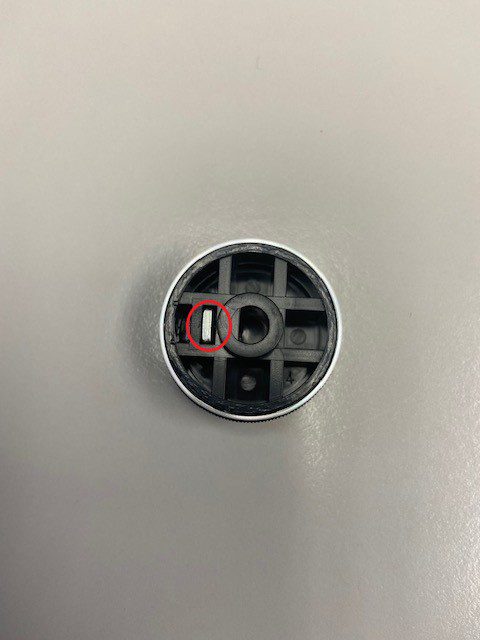
A: It’s unlikely that the set screw is missing, though it may seem like it because the knob keeps falling off and you can’t see the threads of the screw when you look at the underside of the knob.
Q: How can I tell if the set screw is still in tact?
A: Look at the underside of the knob. If you see the metal tab shown in the picture below, then the set screw is in tact. Use a 1.5mm hex wrench to adjust the knob on the base of the switch and – Voila! – “No more knob in the frying pan!”
A: If the metal tab is missing, give us a call and we’ll get you set up with a new knob – 888-933-6529
1: Because the lights are working, we know that there is power going into the hood — good! Next, let’s figure out the source of the motor’s disconnect.
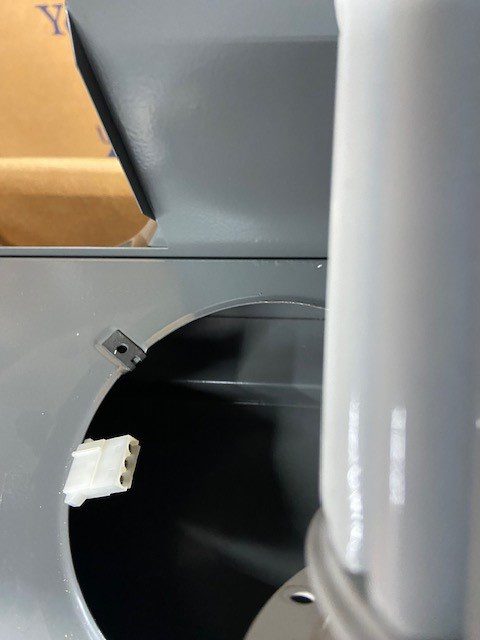
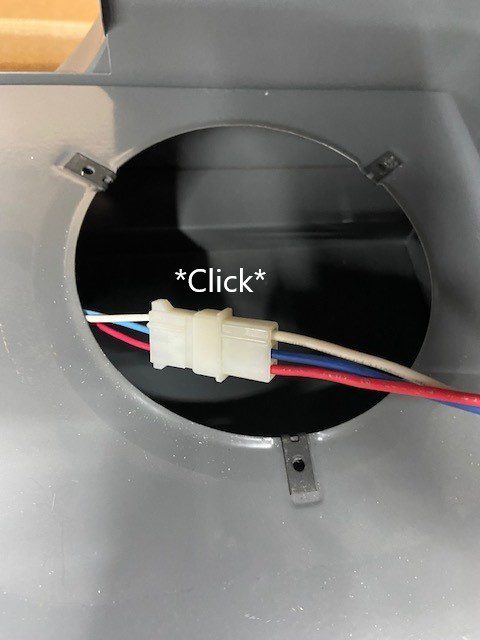
2: The easiest to check, and the most common source of issues like these, is the motor’s quick-connect plug.
a. Remove the 3 motor mount screws holding the motor/plate in place — CAREFUL! Keep a good grip on the motor/wheel as you loosen the screws. The motor is heavy and could damage your cooktop if it is dropped. This can be done with the wheel on or off (images below show both wheel on and wheel off).
b. Ensure that the quick-connect plug/adapter is securely fastened. It should noticeably snap/click into place, and should not pull apart simply by shaking or light tugging on the wiring.
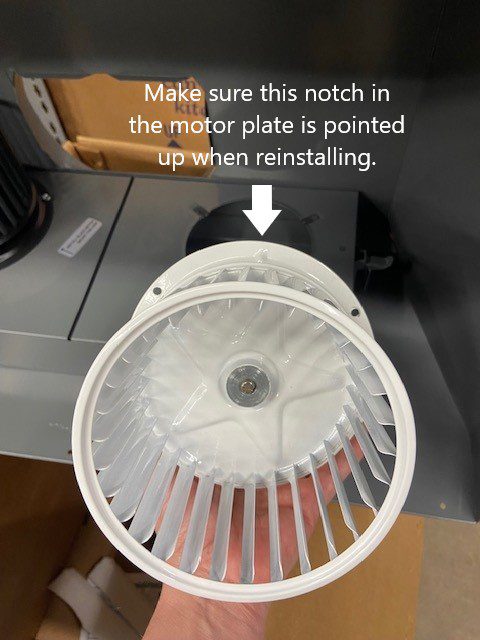
c. Reconnect the plug, if you haven’t done so already, and replace the motor and wheel assembly. Be sure that the notch in the motor plate is pointed up.
3: The motor is securely fastened, but still, nothing happens when you flip the switch? The issue could be the switch or the motor itself.
Give us, Shady Oak, a call 888-933-6529 (Weekdays, 9-5) to:
- Troubleshoot further
- Order parts, and/or
- Get help finding a VAH servicer in your area
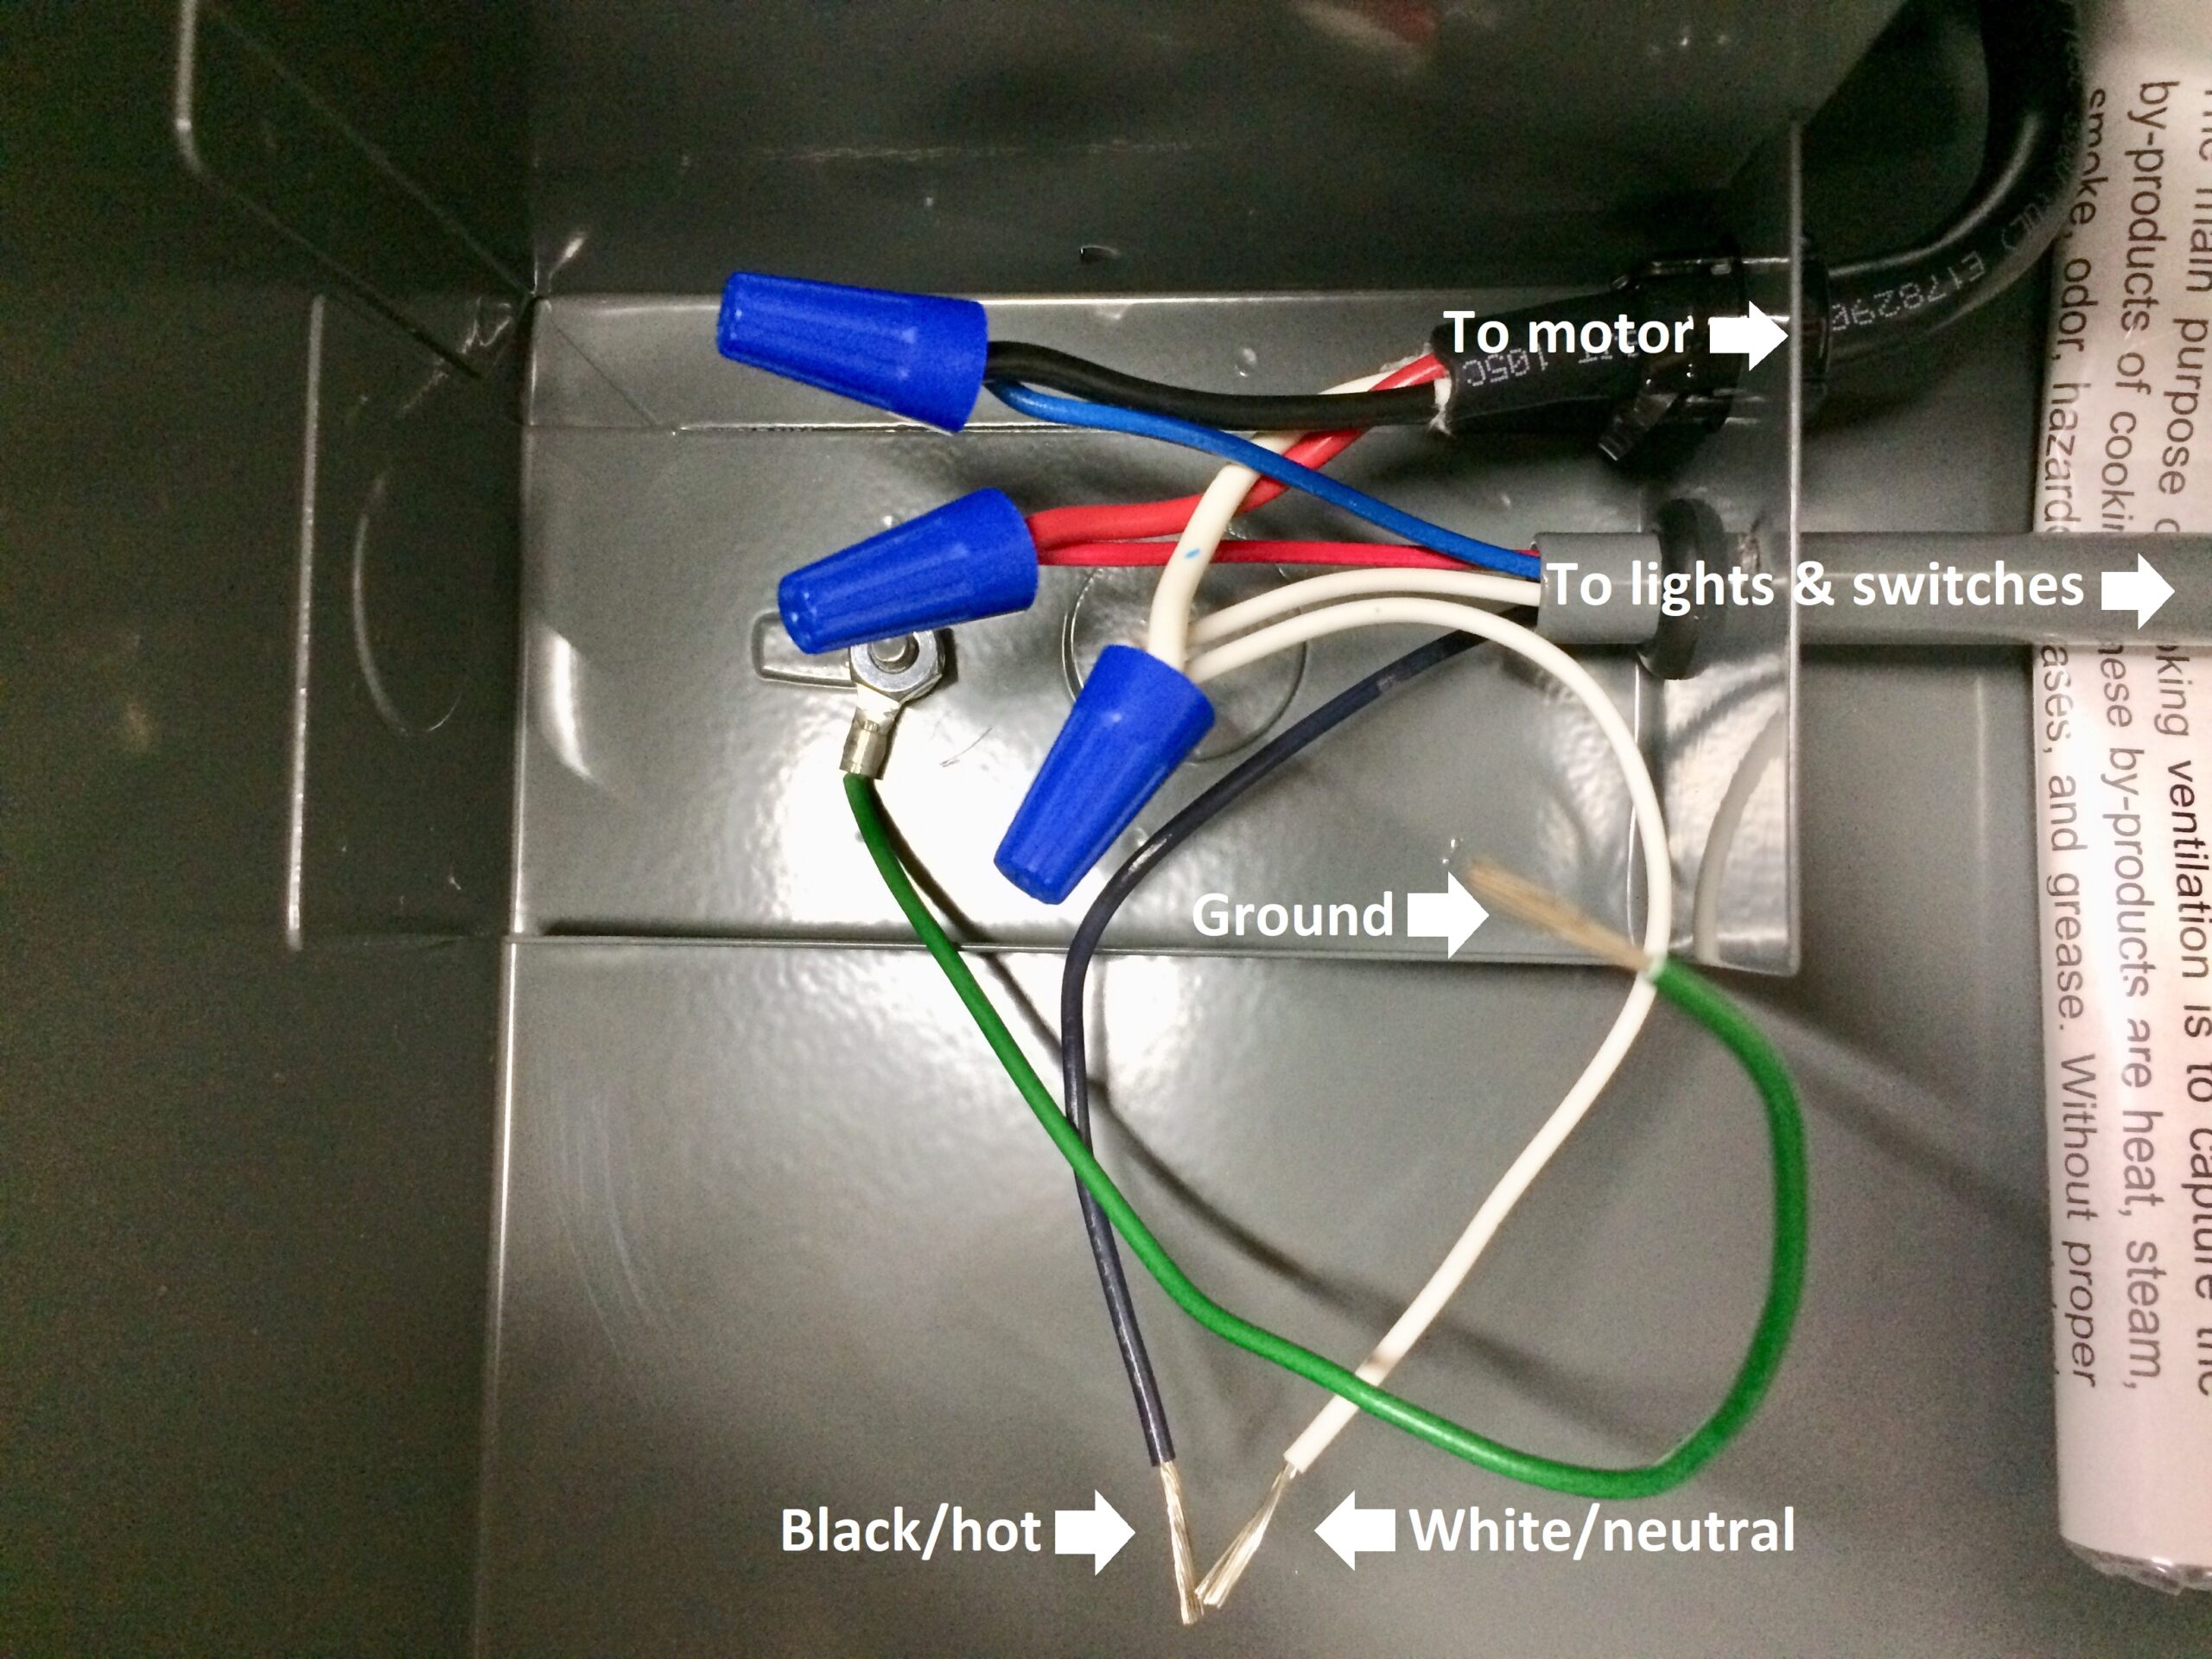
A: The hood has been connected to power improperly. Each single (B100) or dual (B200) blower will have a set of 3 wires to connect to power: White, Black, and Green leads.

The connected wires should have been tucked into the motor box. The steps to check the connections are as follows (Take precautions to cut power to the hood at your home’s electrical panel to avoid serious injury!):
1: Remove the 3 motor mount screws holding the motor/plate in place — CAREFUL! Keep a good grip on the motor/wheel as you loosen the screws. The motor is heavy and could damage your cooktop if it is dropped. This can be done with the wheel on or off (images below show both wheel on and wheel off).
2: Ensure that the quick-connect plug/adapter is securely fastened. It should noticeably snap/click into place, and should not pull apart simply by shaking or light tugging on the wiring. If loose, this could be the source of the problem. If securely fastened, proceed with disconnecting the motor, for now, and set aside in order to inspect the electrical connection.
3: There is not a lot of room for error when you only have 3 wires coming from the wall: White (“neutral”), Black (“hot”), and Copper (“Ground”). Color-match the White lead/White neutral and Black lead/Black hot, and connect Green with Copper ground.
If there is a 4th wire, usually Red “hot”, this may be connected with the Black lead instead, but it should NOT be connected to White or Green. Either the Black “hot” or Red “hot” should be connected to the Black lead and the other “hot” should be capped.
4: Resolved the problem? Great! Reconnect the quick-connect motor plug, and replace the motor and wheel assembly. Be sure that the notch in the motor plate is pointed up.
5: Those steps did not resolve your issue(s)? Snap a photo of the wiring connections and contact us!
Give us, Shady Oak, a call 888-933-6529 (Weekdays, 9-5) to:
- Troubleshoot further
- Order parts, and/or
- Get help finding a VAH servicer in your area
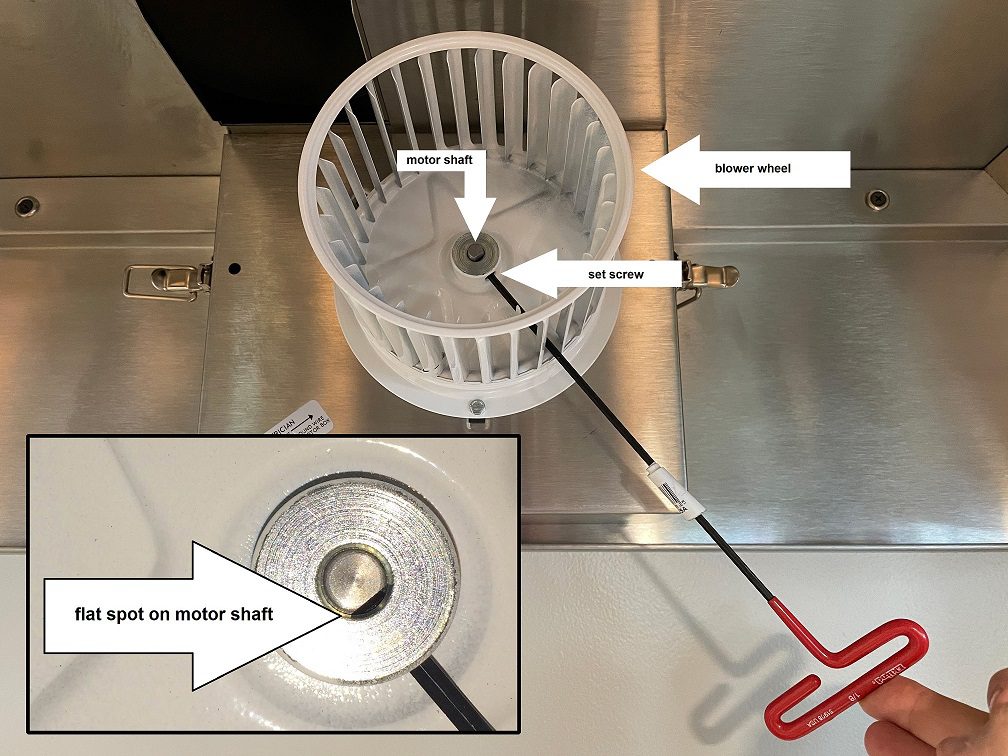
A: Be sure to use an 1/8″ allen wrench (long, T-handle style works best) to loosen the set screw. In instances where the wheel has not been removed in a long time (a year or more), this set screw can be extremely difficult to loosen. The wheel hub may be sprayed with common penetrating oil such as WD-40®, or heated up with a hair-dryer to loosen sticky/hardened cooking grease.
A: If removing the wheel proves to be too difficult while it is still mounted in the canopy, the motor and wheel may be removed as one unit (applicable to Magic Lung hoods – not V-Line/Power Lung) by removing the 3 mounting screws that hold the motor plate in place, and unplugging the quick-connect motor plug. With the wheel and motor down on the countertop or table, it may be easier to work on.
A: More often than not, this is not a malfunction of the hood/motor/blower and sometimes there is no (or very little) audible difference between high/low. Here are a couple things you can try to test this function:
Test 1: Remove the shield, then remove the housing to expose the wheel(s). Make sure your hands and other objects are clear of the wheels. Turn the unit on low, then switch to high. With the wheels exposed, and lack of air pressure, the difference between high/low will be more apparent. If you can then hear the difference between low and high, then all is good. If something still doesn’t seem right, proceed with the following tests; there could be blockage or restriction of airflow within your ductwork.
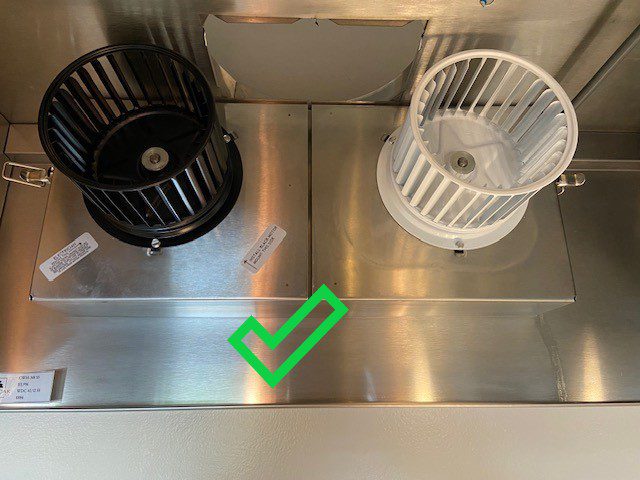
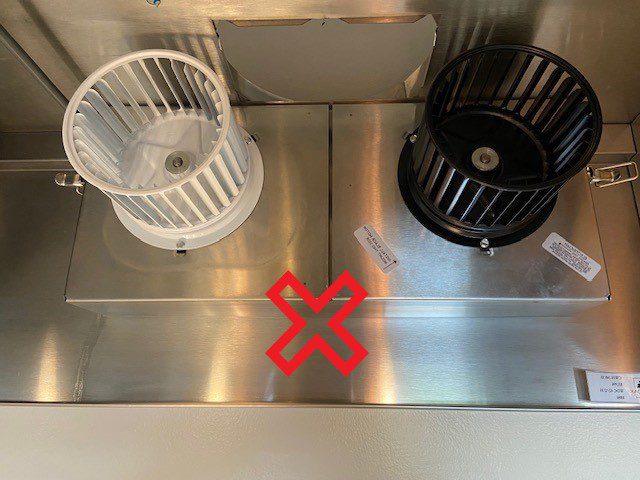
•If you have more than one wheel/blower, make sure the WHITE wheel and motor (the motor itself is not visible at this stage, but the motor plate with the 3 screws holding it in place is, the MOTOR PLATE is painted to indicate its position) is on the RIGHT and the black wheel and motor on the left. If they are reversed the airflow is reversed – not good!
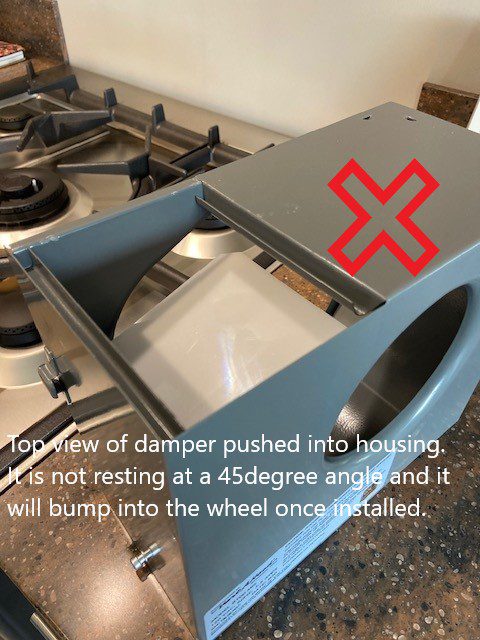
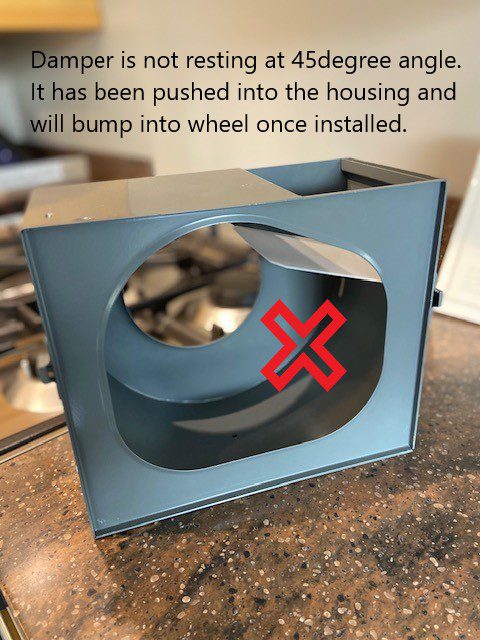
Test 2: While the housing is lowered from Test 1, check that the polymer damper(s) lift freely from the housing: While the unit is off, they should simply rest on top of the housing at a 45º angle. They should not be pushed down through the housing opening. Be sure the damper lifts freely and opens completely vertically.
Test 3: Reinstall the housing (but keep the shield off) and turn the unit on. While looking through the wheel hole of the housing, make sure the internal polymer damper opens completely and freely on both low/high, just as it did when you had the housing down in front of you. If this is restricted in any way, then the motor will likely try to compensate and operate on high speed at all times, hence only one speed would be heard.
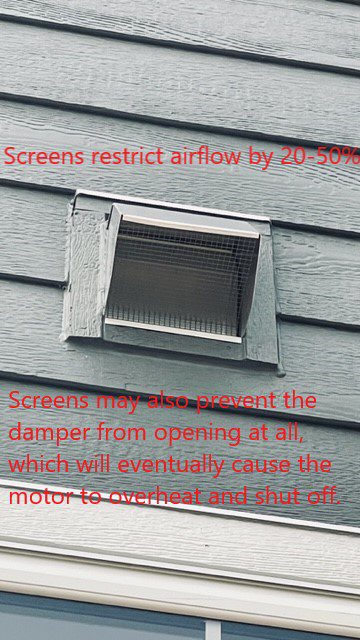
Test 4: If the internal polymer damper(s) open completely during operation, check the exit damper (wall louver or roof jack) on the outside of your house. Depending on the length of your duct run, this damper may or may not open absolutely completely, but it should be moving freely, without resistance or obstruction. Furthermore, there should never be a screen on this damper (see no-no pic below). Screens, no matter how large the webbing, restrict airflow considerably and inhibit the function of a Vent-A-Hood centrifugal range hood, specifically. Air restriction can prompt the motor(s) to overcompensate by operating on high at all times. If restriction is severe enough, the motor may overheat and automatically turn off until it cools back down as a safety measure.
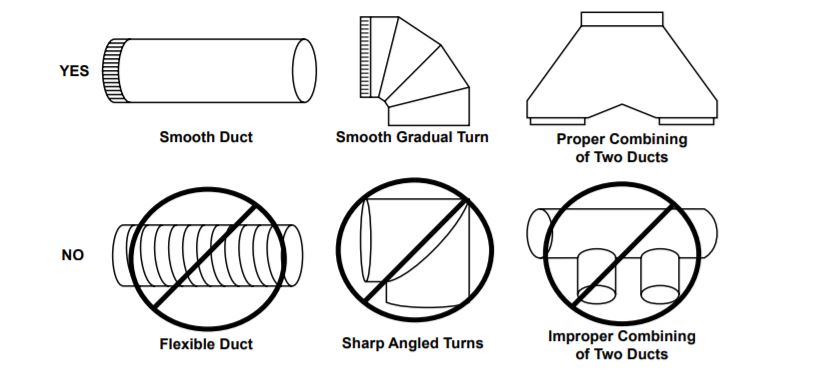
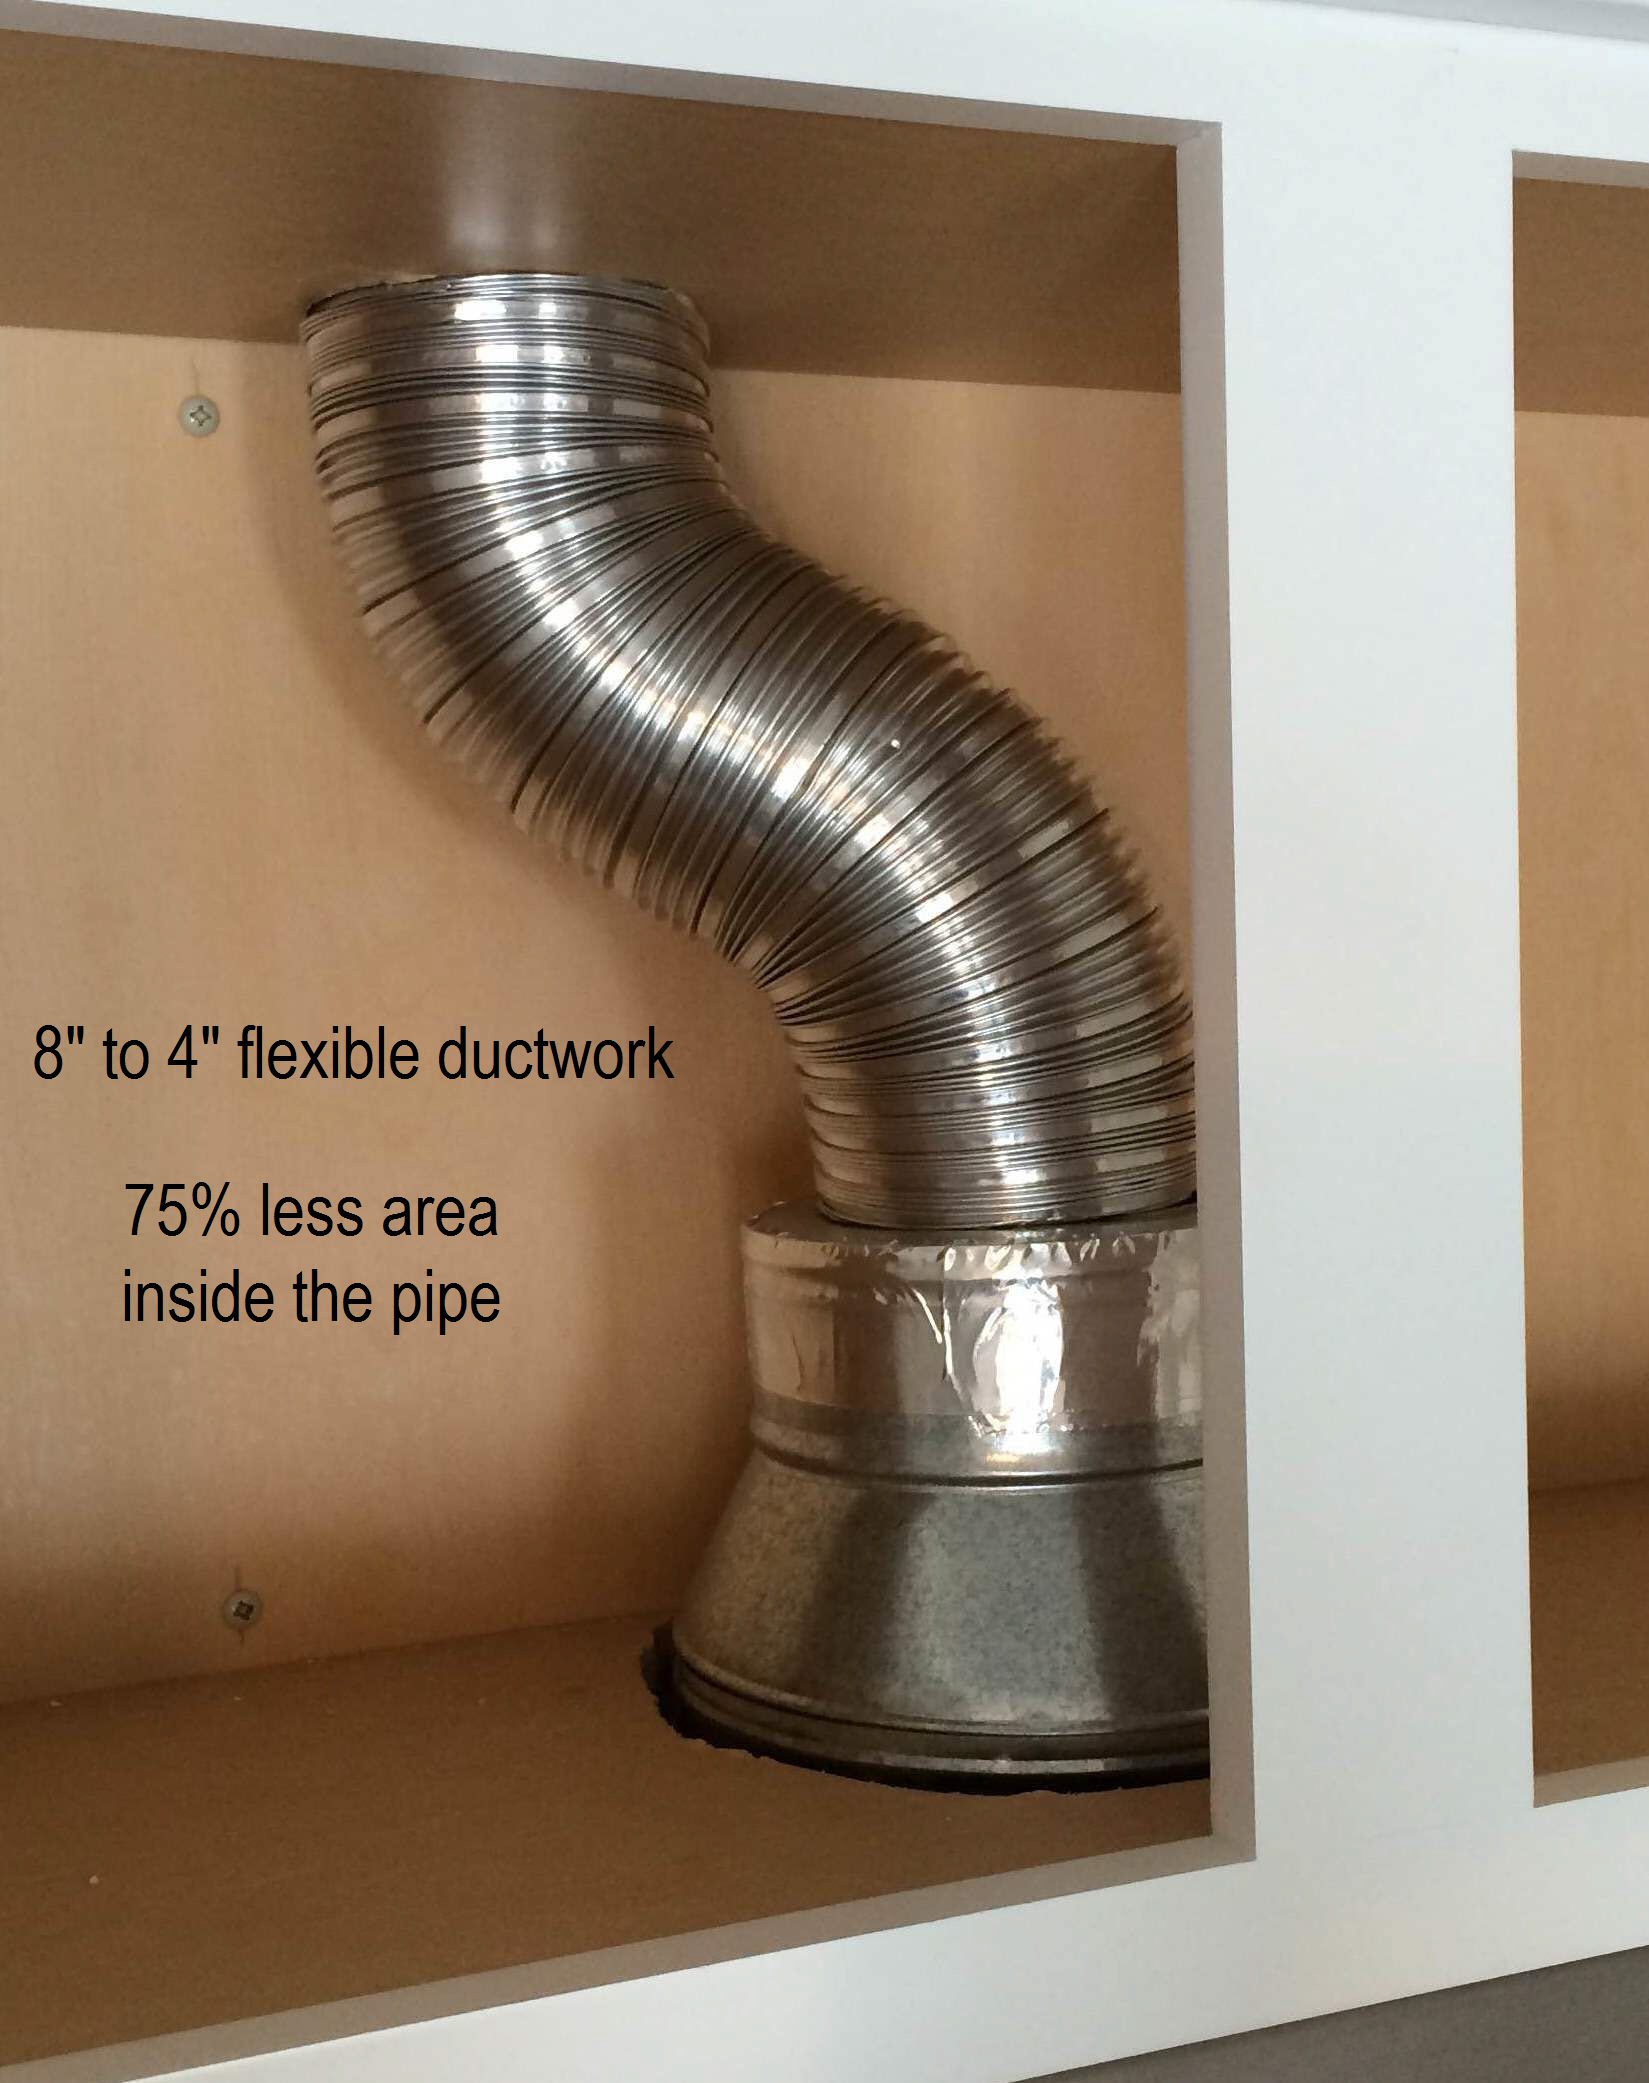
Test 5: For the reasons above, duct work should never be reduced, flex pipe should never be used. Check out our Installation Do’s and Don’t’s for examples, which may be contributing to inadequate performance of your hood.
If you need further explanation or help on any of these steps please do not hesitate to call us at Shady Oak!
A: In almost all cases , this is a result of a power supply or connection issue, rather than a malfunction of the hood. Check these common areas to troubleshoot:
- Tripped breaker on your electrical panel
- Tripped GFCI on the power outlet itself
- Is the power connected to a wall switch? You may not even realize it, but this could be the case if you have a wall switch nearby that seemingly “doesn’t do anything.”
- Check that the power coming into the hood is “hot” with an inexpensive voltage tester tool from the hardware store.
You’ve determined that power is coming in, but still nothing is turning on. Next step is to check that it has been connected to power properly.
Let’s review the V-Line, Power Lung connection:

- Copper/Green – Ground to green lead
- White/White – Neutral to white lead
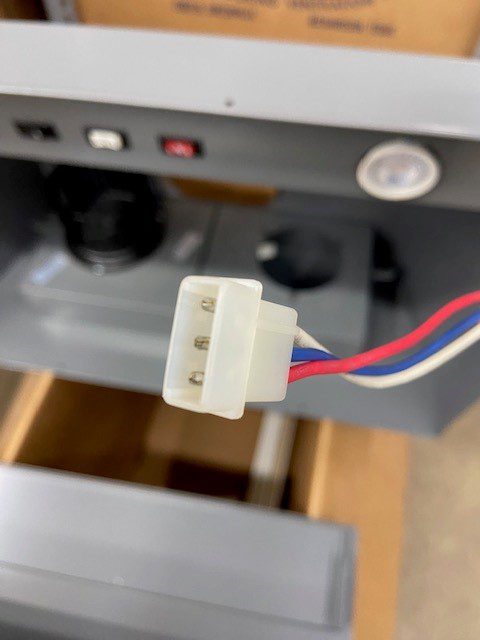
- Internal Red/Red – Red from the metal wireway leading to the light/switch bar connects to the Red from the motor box (red/red with the blue cap pictured). This connection should have already been in place, out of the box, ensure that it is.
- Internal Black/Blue – blue from the wireway and black from the motor box should already have been connected, out of the box, ensure that it is.
- Red or Black/Black -You may just have a black or red “hot” wire, or BOTH. You do not need both, so cap one and use the other to connect to the hood’s black lead coming from the wireway to the light/switch bar. Pictured below, the black “hot” wire is capped, and the red “hot” wire is connected to the black lead (orange cap).
If the steps above proved inconclusive, give us, Shady Oak, a call 888-933-6529 (Weekdays, 9-5) to:
- Troubleshoot further
- Order parts, and/or
- Get help finding a VAH servicer in your area
A: More often than not, this is not a malfunction of the hood/motor/blower and sometimes there is no (or very little) audible difference between high/low. Here are a couple things you can try to test this function:
Test 1: Remove the grease pan. You may turn the hood on low then high with the grease pan still removed – KEEP HANDS AND OBJECTS CLEAR OF THE ROTATING WHEEL! If you can hear the difference between low and high, all is good. If something still doesn’t seem right, proceed with the following tests; there could be blockage or restriction of airflow within your ductwork.
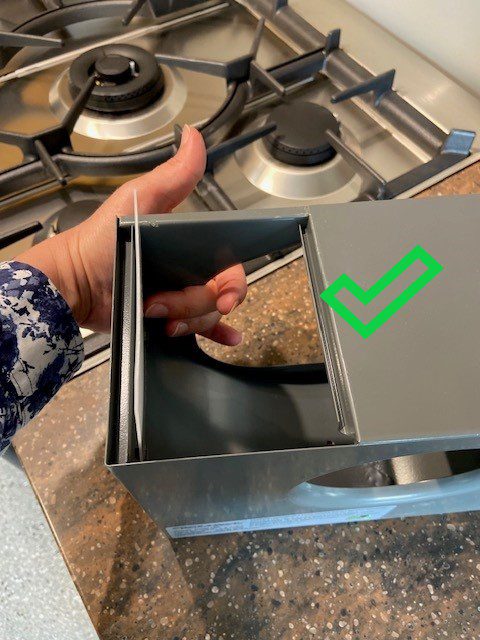
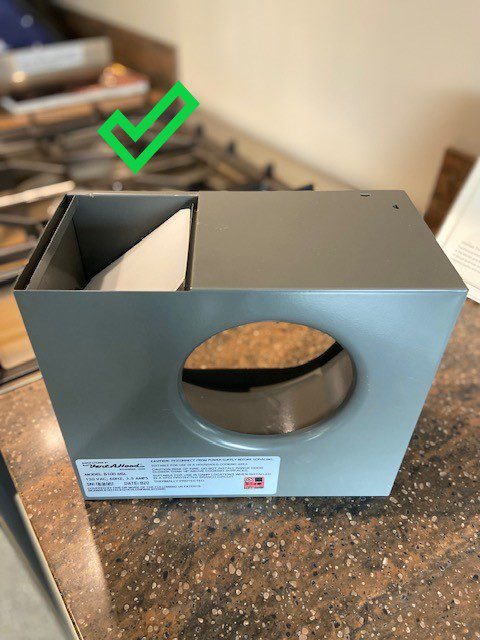
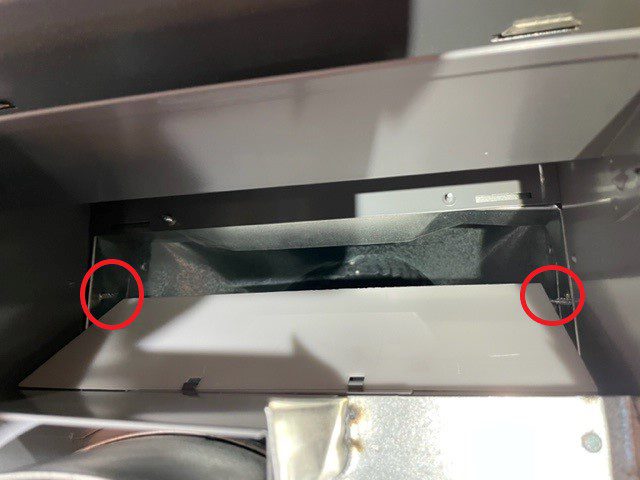
Test 2: While the grease pan is lowered from Test 1, locate the polymer damper at the top, back of the blower box. Ensure that it opens and closes freely when hood is in operation – KEEP HANDS AND OBJECTS CLEAR OF THE ROTATING WHEEL! Turn the hood off and remove the damper. Is there an audible difference between high and low now? Installation screws should not incumber the damper’s mobility (see no-no pic below).
Test 3: If the internal polymer damper opens completely during operation, check the exit damper (wall louver or roof jack) on the outside of your house. Depending on the length of your duct run, this damper may or may not open absolutely completely, but it should be moving freely, without resistance or obstruction. Furthermore, there should never be a screen on this damper. Screens, no matter how large the webbing, restrict airflow considerably and inhibit the function of a Vent-A-Hood centrifugal range hood, specifically. Air restriction can prompt the motor(s) to overcompensate by operating on high at all times. If restriction is severe enough, the motor may overheat and automatically turn off until it cools back down as a safety measure.
Test 4: For the reasons above, duct work should never be reduced, flex pipe should never be used. Check out our Installation Do’s and Don’t’s for examples, which may be contributing to inadequate performance of your hood (see ducting no-no pic below).
If you need further explanation or help on any of these steps please do not hesitate to call us at Shady Oak! Click here for written cleaning instructions.
[K-Series/V-Line/Power Lung] Remove and Replace wheel/motor
A: Usually, no. The SensaSource® technology automatically switches the two-speed motor from low to high speed once the canopy reaches a certain temperature. This is a safety and efficiency measure. The blower must be working at 250 cfm or higher in order to trap grease vapor within the housing, preventing it from passing through to the duct work.
A: No, the hood needs to be turned on manually. The white dual-speed motor (single blower or right side of dual blower) may only go from low to high, not on from off. Likewise, the black single-speed motor (left side of a dual blower) will not turn on from off or change speeds, because it is a single-speed motor.
- Choose a Vent-A-Hood (VAH) Magic Lung® product, first and foremost. A VAH 300 cfm range hood works as efficiently as the leading competitor’s 450 cfm hood. And 600 cfm VAH is equivalent to 900 cfm of the other guys. So, you’re able to remove air contaminants more effectively, at a lower cfm rating, with VAH Magic Lung®.
- Supersize your canopy! Capture area is just as important as CFM, when it comes to Vent-A-Hood.
- If the threat of make-up air is giving you cold feet, understand that it doesn’t have to break the bank! Shady Oak has partnered with EP Sales, Inc. to offer a concise, easy-to-understand solution by Thermolec. Contact Shady Oak to explore your options.
A: One explanation would be that the motor overheated and then shut off as a fail-safe measure.
Q: Why did the motor overheat? Check out our Installation Do’s & Don’ts.
1: There may be a blockage or restriction of airflow at some point along your duct run. Is the external damper (the one at the exit of your house) or the internal damper (within the hood canopy) opening fully and freely?
2: Is the duct work the appropriate, recommended size to accommodate the airflow? See the installation guide for proper duct sizes for your particular hood. Also, check out our installation do’s and don’ts pages (Magic Lung & V-Line Power Lung) for specific examples.
3: Another, less common, explanation could be a malfunction of the SensaSource thermostat. Magic Lung and Power Lung hoods are equipped with a thermostat that automatically turns the 2-speed motor from low to high when the temperature threshold is reached.
Move on to the next ‘Q’ to troubleshoot proper function of the SensaSource thermostat.
A: If replacing a burnt out motor, be sure to check the wiring of the SensaSource thermostat. If that is the source of the problem, then it needs to be remedied otherwise the replacement motor will eventually fail as well.
Details: The SensaSource is connected to three wires that should be color matched: Gray, Blue, and Red. Improper connections could lead to the motor turning off and/or burning out.
A: A faulty SensaSource could also leave the blower stuck on low/high regardless of temperature or low/high switch position.
Test your SensaSource: While leaving your stove top OFF, turn your hood on low, hold an ignited butane lighter up to the SensaSource module and your hood should kick up to high speed after several seconds. Remove the flame, and the hood should go back down to low speed after it has cooled down. If the hood shuts off rather than bumping up to high speed, then the SensaSource likely needs to be replaced, or at least checked for proper wiring.
Give us a call, we can help!
A: Click here! We have a whole bunch of additional resources at your fingertips. If you don’t see what you’re looking for, please contact us at Shady Oak. We’re more than happy to help in any way we can.
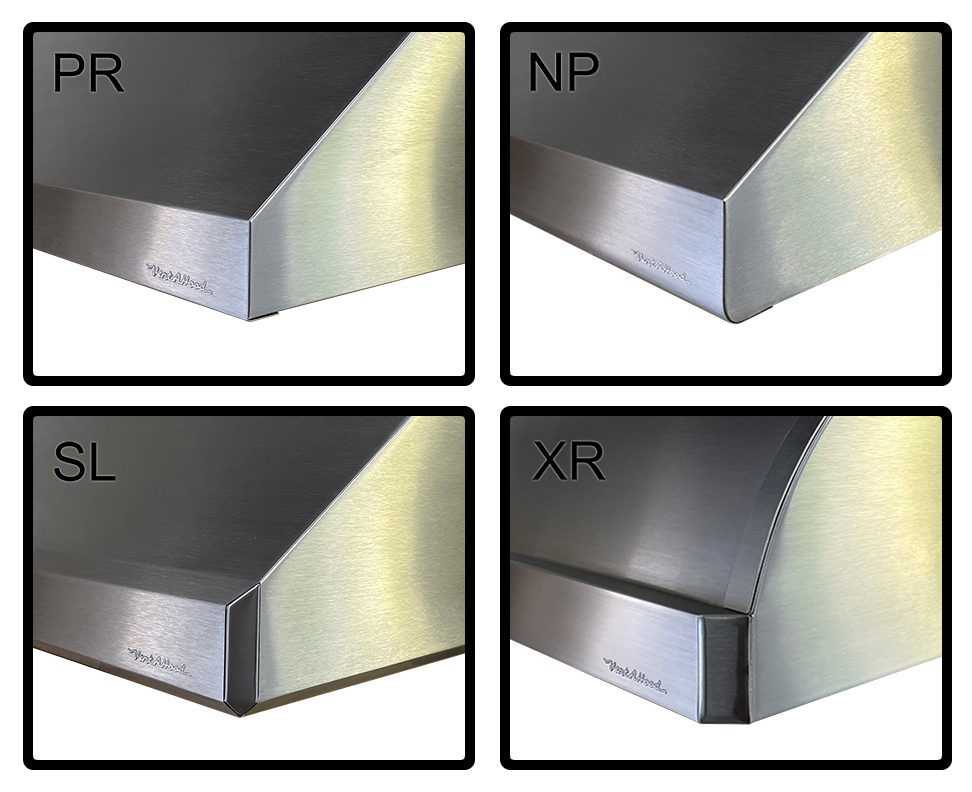
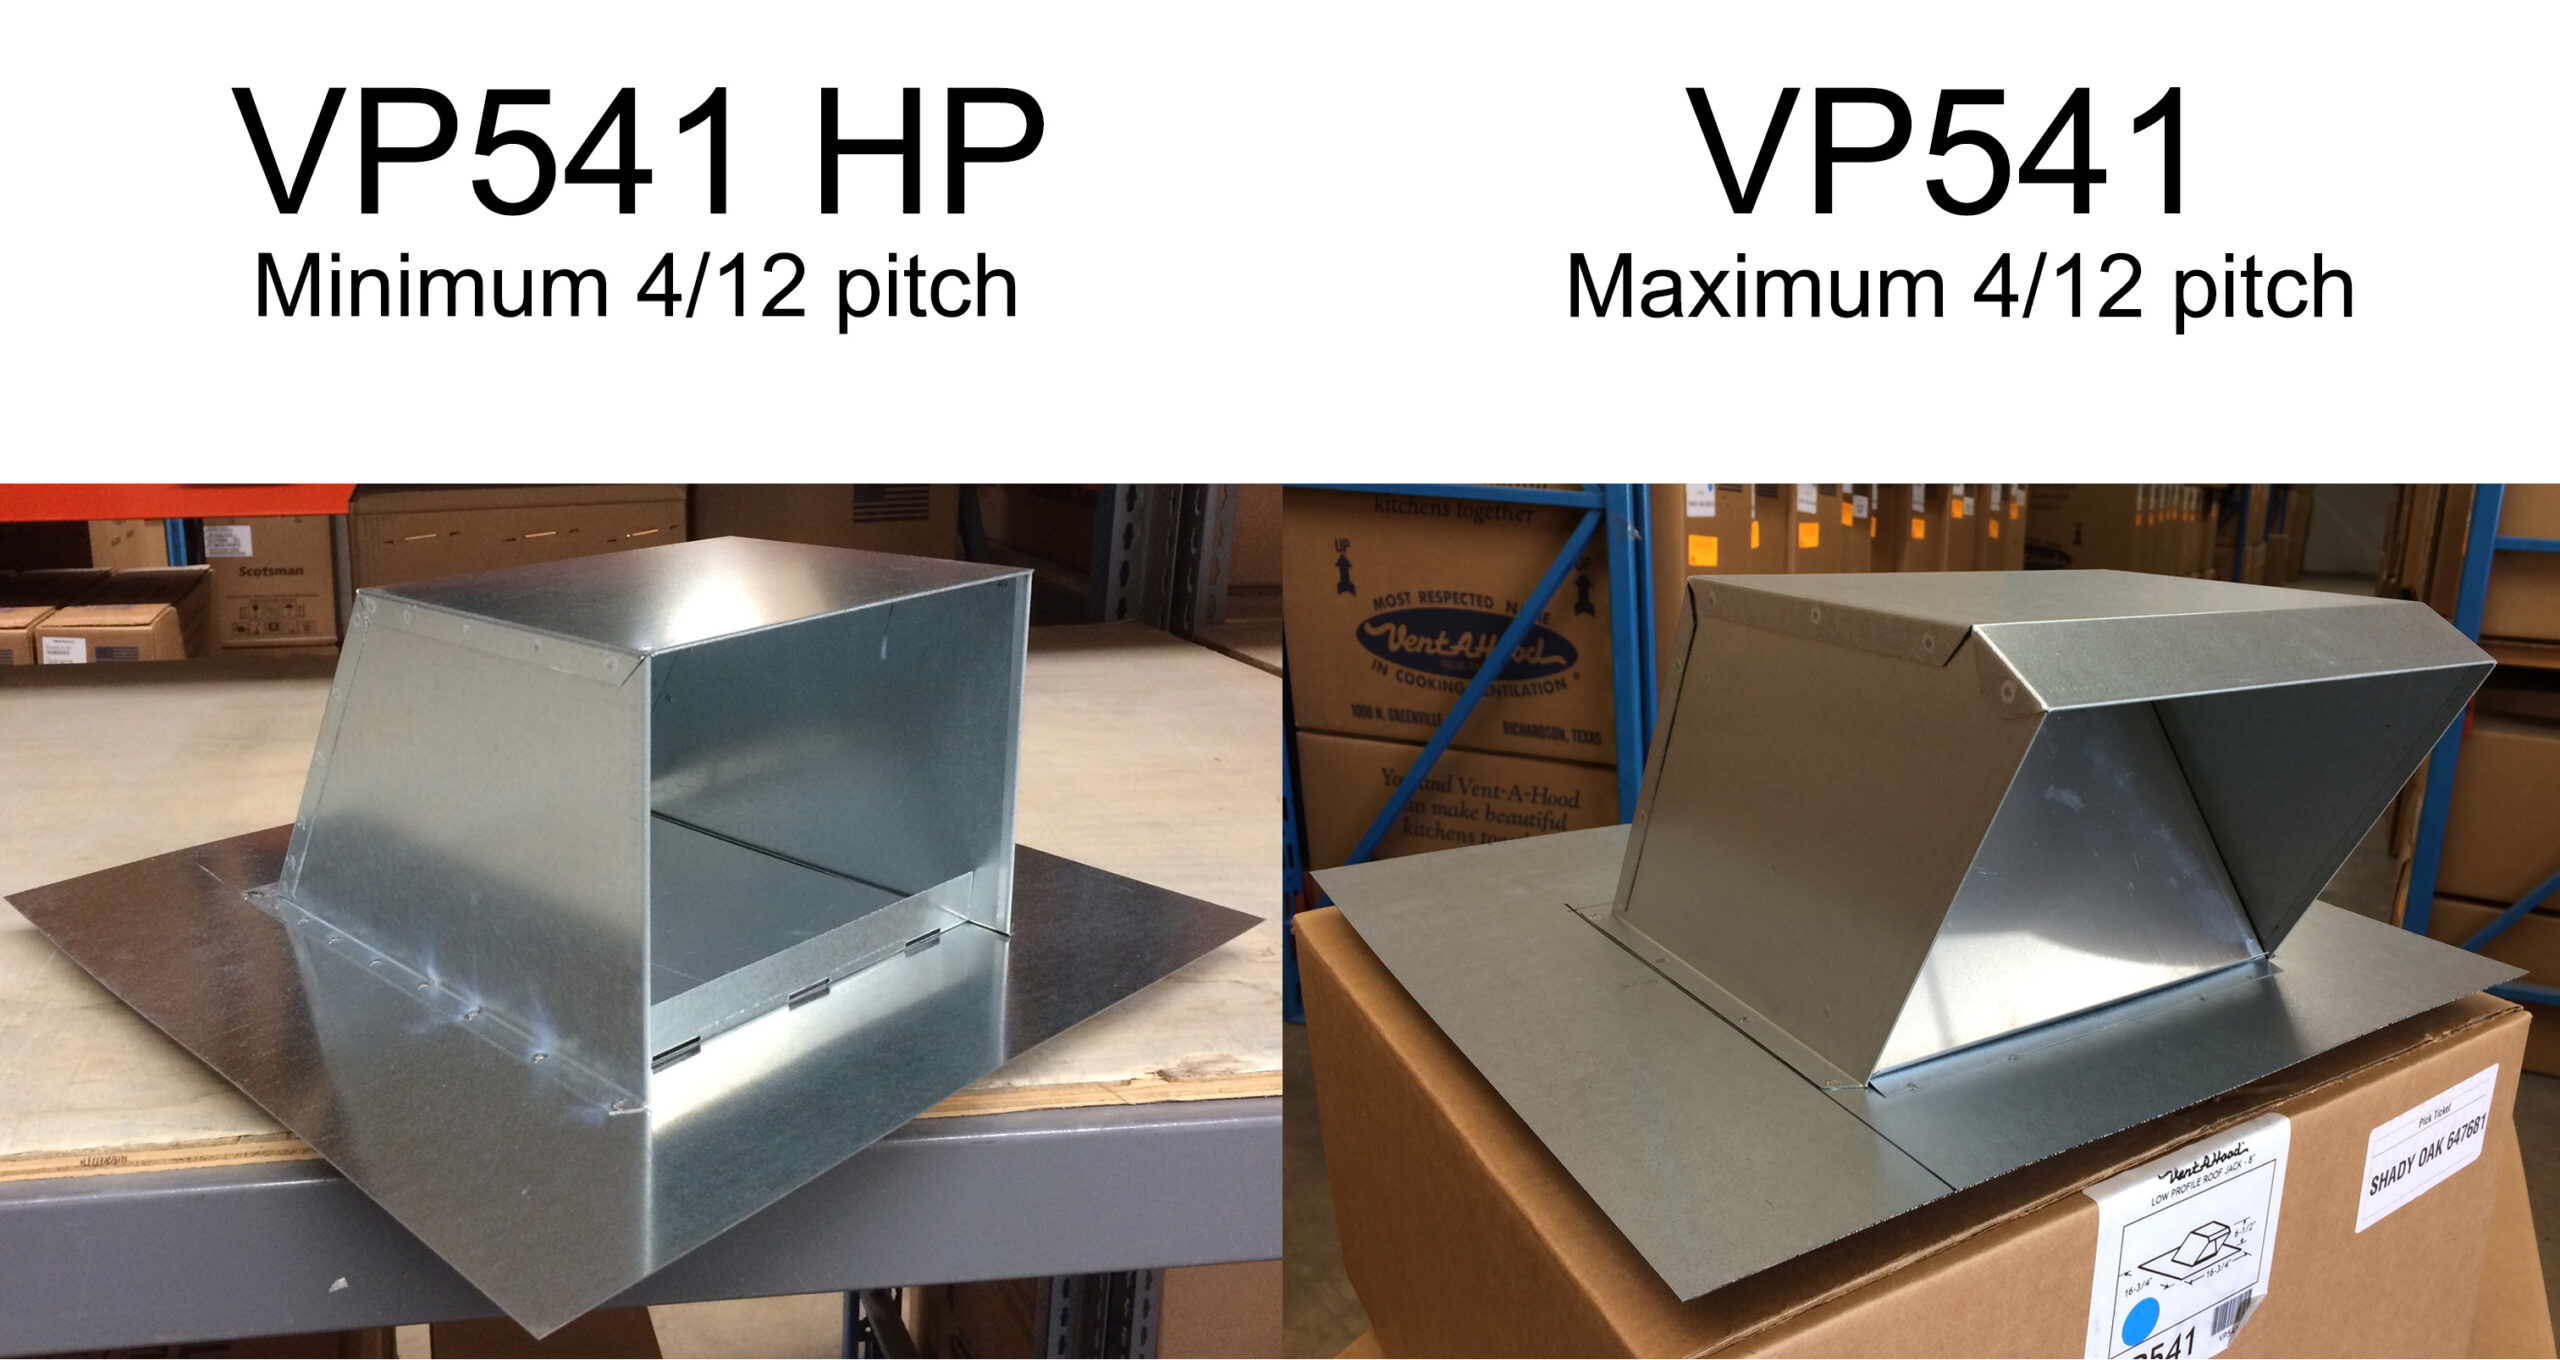
A: Check out the image below!
A: Check out our Tree House where we have great prices on display, discontinued, and blemished items.
A: Here is a ducting accessory and parts list. You can find more information on our Resources page. If all else fails, drop us a line; we’re here to help!
Watch the video below for a helpful tutorial on removing a stuck blower wheel:

A: This is a common issue with all ranges, not specific to ILVE. To troubleshoot, follow these steps in order:
- Clean the igniter surface and burner head with a non-scratch cleaning pad. If that doesn’t do the trick, proceed to step 2.
- Use a flathead screwdriver, or metal file, to file the metal head of the igniter and burner head where the spark hits. Sometimes the carbon build-up is too tough for the scratch pad to penetrate. If that doesn’t do it, proceed to step 3.
- Check the igniter connections on the spark module and swap it to a connection that has been confirmed to work. Use the knob of the confirmed connection to activate the igniter. If it sparks, then it can be determined that the spark module has a bad connection and needs replacement. If still no spark, proceed to step 4. ** NOTE: Gas will flow while testing, so just turn the knob long enough to confirm spark or no spark.
- The igniter or the wire from the module to the igniter needs to be replaced. To determine which, use a voltmeter on the wire connection while turning the knob to create current. If there is current when the knob is turned, the igniter needs replacement. If no current, the wire will need to be replaced.
- Finally, if everything has been tested above and nothing works, it’s possible that the module is not receiving correct level of electricity. Check the power electric board or relay connection points, depending on the model, to see if there is an incorrect voltage being sent to the spark module. The voltage level should be standard and specified in the unit’s installation manual.
- If it is incorrect, check the voltage from each connection point down to the end of the power cable where it connects to the first board or relay.
- If that is also incorrect, check the outlet for proper voltage as it may be an issue that requires an electrician.
99% of the time, going through these steps will identify the problem.
A: The all-gas 30″ Nostalgie doesn’t have a thermocouple (contrary to what the manual describes in the link below). You must leave the oven door open/ajar for a couple minutes so the flue/vent can heat up to ensure enough oxygen flow in the oven to stay ignited.
The manual that came with your Nostalgie likely doesn’t mention this because that generic manual focuses mainly on the more common dual fuel models, rather than the all-gas.
This manual may help — Flip to the “Gas Ovens” section starting on Page 28! This manual is a bit generic too in that you don’t actually need to hold the knob in for 15 seconds because this particular model doesn’t have a thermocouple.
A: If you have a blinking ‘A’ on your Professional Plus or Nostalgie range screen, then your oven is in Automatic Mode, so the manual knobs will not work to turn on fan or heat. To reset, hold down the Cooking Time  and End Cooking Time
  buttons, simultaneously.
A: In the rare case you find yourself in a position where the thermostats need to be replaced, this guide may help walk you through those steps. Please be sure to consult a qualified appliance service technician!
A: Click here! We have additional resources at your fingertips. Or visit us.ilve.com!